LXC-Containers are very useful. They are more leightweight than virtual machines and not as static as docker-containers. That’s why I like them especially for my server environments. In this article I will show a very basic setup of LXC-Containers on Debian Jessie.
Creating a Network-Bridge
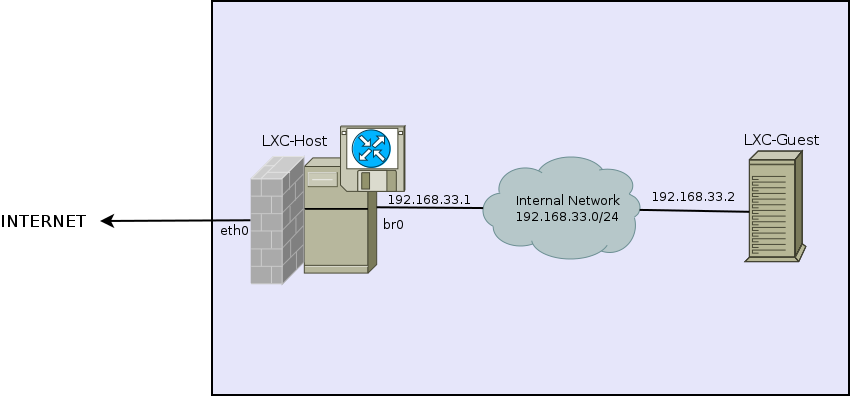
I use a network-bridge with a dummy-interface for my virtual internal network:
This is a sample /etc/network/interface for the LXC-Host:
auto br0
iface br0 inet static
address 192.168.33.1
netmask 255.255.255.0
broadcast 192.168.33.255
bridge_ports dummy0
bridge_fd 2.0
bridge_maxwait 1
Installing dnsmasq
It’s possible to use the dns-server of the provider. But I always prefer a dns-forwarder like dnsmasq on the lxc-host:
apt-get install dnsmasq
dnsmasq should listen on br0-only. So we edit /etc/dnsmasq.conf:
interface=br0
..and restart the service:
service dnsmasq restart
Installing LXC
apt-get install lxc
Creating a LXC-Container
If /var/lib/lxc is located on a btrfs, then we can automatically create a subvolume using option “-B btrfs”:
lxc-create -n CONTAINERNAME -t debian -B btrfs -- -r jessie
Otherwise we can just call lxc-create without -B:
lxc-create -n CONTAINERNAME -t debian -- -r jessie
If the container was created, we can edit it’s config /var/lib/lxc/CONTAINERNAME/config:
# Parameters passed to the template: -r jessie
# For additional config options, please look at lxc.container.conf(5)
lxc.network.type = empty
lxc.rootfs = /var/lib/lxc/sec/rootfs

# Common configuration
lxc.include = /usr/share/lxc/config/debian.common.conf

# Container specific configuration
lxc.mount = /var/lib/lxc/sec/fstab
# CHANGE THE CONTAINER-NAME HERE
lxc.utsname = CONTAINERNAME
lxc.arch = amd64
lxc.autodev = 1
lxc.kmsg = 0
lxc.tty = 6
lxc.start.auto = 1

lxc.network.type = veth
lxc.network.name = veth0
lxc.network.flags = up
lxc.network.link = br0
Now let’s chroot into the container and install some packages we need:
chroot chroot /var/lib/lxc/CONTAINERNAME/rootfs/ /bin/bash
apt-get update && apt-get install iputils-ping dnsutils resolvconf vim rsyslog logrotate
Still in the chroot-system we could also edit our network-config in /etc/network/interfaces:
auto lo
iface lo inet loopback

auto veth0
iface veth0 inet static
address 192.168.33.2
netmask 255.255.255.0
gateway 192.168.33.1
dns-nameservers 192.168.33.1
Using “exit” we can escape from our chroot.
Starting the Container
lxc-start -d -n CONTAINERNAME
Get a Console for a Container
lxc-console -n CONTAINERNAME
The exit the console just call “ctrl+a q”
Firewalling and Routing
Normally I prefer to install shorewall to have the full power of greyskull. But for this example I will just use a very simple iptables-script.
/usr/local/sbin/masq.sh:
#!/bin/bash
        iptables -P FORWARD ACCEPT
	echo 1 > /proc/sys/net/ipv4/ip_forward
	iptables -t nat -A POSTROUTING -o eth0 -j MASQUERADE
We can execute this script manually or use it in the /etc/network/interfaces for an up-directive. Since this script is not meant to run in production(because it’s not secure!) I will not publish an example how to autostart it using the interfaces-file.
Final Words
LXC is a very cool technique to run containers. It’s even possible to run containers inside a virtual machine(for example kvm). I prefer to install my containers on BTRFS-filesystems and use Snapper to automatically create and manage snapshots.